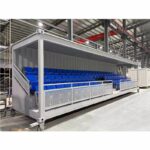
How to build a shipping container office?2 methods about Container office project solution Many people’s first encounter with Container Office left them with questions about it. what is shipping container office? how to build a shipping container office? There are two solutions for the project of setting up a container office. The first option is […]
Many people’s first encounter with Container Office left them with questions about it. what is shipping container office? how to build a shipping container office? There are two solutions for the project of setting up a container office. The first option is to go to the container storage yard by yourself, select the containers and then make modifications on your own. The second option is to renovate the container office by hiring a professional factory. This article will introduce the two types of office setup methods and conduct a comparison between them, helping you choose the appropriate solution for your container office.
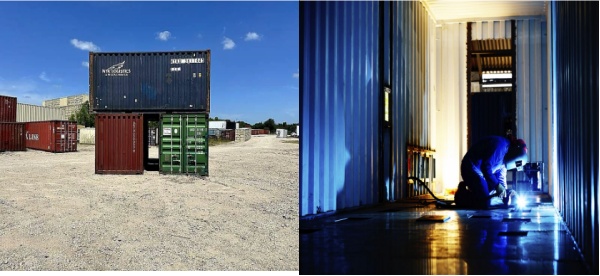
Pick in Person: Visit a container yard to inspect the condition of the unit. A second-hand 20ft container can be a cost-effective base.
Smart Placement: If space is limited, consider stacking the container. Ensure you have the right equipment (like a forklift or hiab truck) for precise positioning.
Create Access: Building a mezzanine or external stairs provides a professional entrance and safe access if the unit is elevated.
The “Door-in-Door” Strategy: Instead of cutting off the heavy original cargo doors, fold them back and install a modern sliding glass door just inside. This preserves the container’s value and improves insulation.
Window Frames: Cutting steel causes tension shifts (and loud noises). All openings must be reinforced with welded steel box sections (e.g., 80x40mm) to house the windows securely.
Reclaimed Materials: Source second-hand windows and doors to significantly slash your budget.
Timber Battening: Use wooden battens to create an internal frame for attaching wall panels.
Spray Foam is King: Use a two-part expanding spray foam for the walls and ceiling. It provides the best airtight seal and thermal performance, though it is messy and requires full PPE.
The Flooring Debate: Don’t rip up the original 28mm plywood floor unless absolutely necessary. It is labor-intensive and unnecessary; simply sealing it or laying new flooring on top is more efficient.
Future-Proofing: Install more power sockets than you think you need. Run extra data cables and leave access points for potential future upgrades (like plumbing or fiber optics).
Task Lighting: Ensure sufficient overhead lighting and dedicated workspace lamps to create a comfortable office environment year-round.
Hard-Wearing Walls: OSB (Oriented Strand Board) is a great choice for walls—it’s durable, budget-friendly, and allows you to screw light fixtures directly into the panels.
Space Optimization: Use wall-mounted monitors to keep the desk surface clear. Support long desks with filing cabinets to combine storage with structural support.
The Pros (Advantages)
Cost-Efficiency: By sourcing reclaimed materials (second-hand windows, doors, and flooring) from platforms like eBay or Facebook Marketplace, you can significantly reduce the total investment.
Sustainability: Reusing a “retired” shipping container and second-hand interior components is an eco-friendly construction method.
Durability: The core structure is made of Corten steel, which is extremely strong, weather-resistant, and secure compared to traditional timber sheds.
Customization: DIY allows you to design the layout specifically for your needs, such as placing windows exactly where you want your monitors to be.
Team Building: If built with colleagues, the project serves as a great collaborative exercise and creates a shared sense of pride in the workspace.
The Cons (Disadvantages)
Hidden Labor Costs: While material costs might be low, the time investment is high. A typical build can take 6–8 weeks of intensive manual labor.
Technical Difficulty: Tasks like welding steel frames into thin corrugated walls or installing complex electrical circuits require professional skills that a beginner may not have.
Thermal Management (Heat/Cold): Containers act like “heat sinks.” Without expensive spray foam insulation, they become freezing in winter and like ovens in summer.
Complexity of Modification: Cutting into the steel walls causes the structure to shift and move loudly. It is much harder to modify than wood or drywall.
The “Mess” Factor: Using professional-grade materials like two-part expanding foam is extremely messy and requires specialized protective gear (PPE).
Step 1: Planning & Design (Requirement Analysis)
Define Layout: Use CAD software or sketches to visualize the office.
Size Selection: Choose between standard sizes (10ft, 20ft, or 40ft).
Space Allocation: Plan for furniture, storage, partitions, and equipment.
Step 2: Sourcing & Selection (The Procurement Phase)
Quality Check: Ensure the unit is structurally sound (New or High-Grade Used).
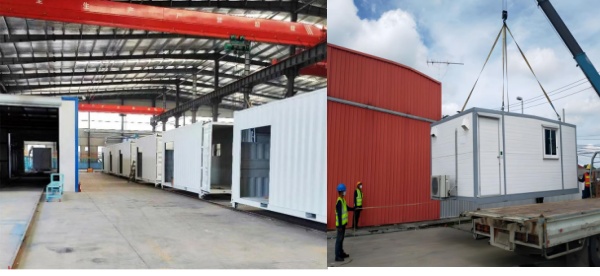
Manufacturer Support: Select a supplier that provides end-to-end guidance, from initial planning to final site installation.
Step 3: Customization (Modification & Installation)
Openings: Professional installation of windows and customized doors.
Climate Control: Apply Spray Foam Insulation to prevent condensation and stabilize temperature.
Flooring: Install durable materials like Vinyl (PVC) for a professional finish.
Step 4: Utility & Security Setup
Electrical Works: Professional wiring for lighting, power outlets, and HVAC (Heating/AC).
Step 5: Confirm the price, delivery date, order quantity and payment method with the supplier.
Step 6: Select an appropriate transportation plan. After clearing customs by yourself, transport the goods to your destination by truck.
If you are a procurement professional or a business manager looking to buy a container office from a manufacturer/supplier (rather than building it yourself), here is a clear summary of the Pros and Cons.
I have used simple, professional English that is easy to include in a business report or email.
The Pros (Advantages)
Turnkey Solution (Ready-to-Use): The supplier handles everything—design, insulation, and electrical. You receive a finished product that is ready to plug in and work.
Quality Assurance (QA): Professional manufacturers follow strict quality standards. This ensures the unit is weatherproof, the welding is strong, and the electrical wiring is safe/certified.
Regulatory Compliance: Reputable suppliers understand building codes and permits. They help ensure your office meets local legal requirements.
Time Savings: Manufacturers have specialized tools and teams. They can finish a container in a fraction of the time it takes for a DIY project.
Warranty & Support: Most suppliers provide a warranty and after-sales service (repairs/maintenance), which reduces your long-term risk.
The Cons (Disadvantages)
Higher Initial Cost: Buying from a supplier is more expensive than a DIY build because you are paying for professional labor, overhead, and profit margins.
Less Creative Control: While they offer customization, you are often limited to the supplier’s specific materials, window styles, and floor plans.
Delivery & Logistics: Shipping a fully modified container is expensive. You must also ensure your site has enough space and a solid foundation for a heavy delivery truck.
Hidden Fees: Beyond the purchase price, you must budget for site preparation (leveling the ground), crane hire (if needed), and utility connections (plumbing/electricity).
Inadequate Research: Failing to check local building codes/permits.
Poor Foundation: Not preparing a solid ground site before delivery.
Budget Underestimation: Forgetting to budget for permits, site prep, and utility connections.
Selection of Container Office Types:The appropriate size of the container office should be selected based on one’s own budget, the number of employees and the office area.
Inexperienced Contractors: Hiring builders who are unfamiliar with shipping container structural limits.
Procurement Professional Tip
“Turnkey” Solution: If you want to save time and reduce risk, buy a pre-fabricated (ready-made) mobile office. It simplifies the supply chain because one vendor handles the design, modification, and warranty.
| Category | Method 1: DIY (Container Yard Procurement) | Method 2: Professional Manufacturer (Prefab / Turnkey Solution) |
|---|---|---|
| Description | Self-build approach: Buy a used container from a storage yard and modify it yourself. | Hire a professional factory to design, modify, and deliver a finished container office. |
| Best For | Individuals or small teams with time, skills, and desire for full customization. | Businesses, procurement professionals, or those who want a fast, low-risk solution. |
| Main Steps | 1. Sourcing & Positioning (Visit yard, select container, position with crane/forklift) 2. Openings & Structural Work (Door-in-Door, reinforced windows) 3. Insulation & Framing (Spray foam, timber battens) 4. Electrical & Lighting 5. Interior Finishing (OSB walls, flooring, furniture) | 1. Planning & Design (Layout, size selection) 2. Sourcing & Selection (Choose manufacturer) 3. Customization (Windows, insulation, flooring) 4. Utility & Security Setup (Electrical, HVAC) 5. Confirm price, delivery, and transportation |
| Container Size Options | Usually starts with 20ft (cost-effective) | 10ft, 20ft, 40ft (flexible according to needs) |
| Time Required | 6–8 weeks (intensive manual labor) | Much faster (factory production + delivery) |
| Cost | Lower initial material cost (especially with reclaimed materials) | Higher upfront cost (includes professional labor and profit) |
| Key Materials & Techniques | • Second-hand windows/doors • Spray foam insulation • Timber battens + OSB boards • Original plywood floor (recommended to keep) | • Professional spray foam insulation • High-quality windows & doors • Durable vinyl/PVC flooring • Certified electrical & HVAC |
| Skills Required | High (welding, cutting steel, electrical, insulation) | Low (supplier handles all technical work) |
| Advantages (Pros) | • Cost-efficient • Highly customizable • Eco-friendly (reuse + reclaimed materials) • Strong Corten steel structure • Team-building experience | • Turnkey / Ready-to-use • Professional quality & safety • Regulatory compliance & warranty • Time-saving • After-sales support |
| Disadvantages (Cons) | • High labor time & physical effort • Technical difficulty & safety risks • Poor thermal performance if insulation is inadequate • Messy process • Structural modification challenges | • Higher total cost • Less creative control • Expensive delivery & logistics • Hidden fees (site prep, crane, utilities) |
| Risk Level | High (especially for beginners) | Low |
| Sustainability | Excellent (reusing old containers + second-hand items) | Good (depends on manufacturer) |
| Recommended When | You have construction skills, limited budget, and plenty of time | You need speed, professionalism, compliance, and want minimal hassle |
The secret of how to build a shipping container office successfully lies in preparation. If you have the tools and time, the DIY method offers a unique, cost-effective challenge. However, if you need a professional, compliant, and durable workspace with minimal stress, partnering with a manufacturer is the superior business solution. Regardless of your choice, always ensure your site has a level foundation and proper permits before delivery.
Your email address will not be published. Required fields are marked *
 English