News

Expandable container house installation

04.01.2026

Fast and Reliable Expandable Container House Installation: A Guide for Wholesalers For international importers and distributors, the speed of an expandable container house installation is a premier selling point that differentiates your inventory in a competitive market. Unlike traditional modular buildings that require weeks of labor, our expandable units are engineered for a “rapid-deploy” workflow. […]

Fast and Reliable Expandable Container House Installation: A Guide for Wholesalers

For international importers and distributors, the speed of an expandable container house installation is a premier selling point that differentiates your inventory in a competitive market. Unlike traditional modular buildings that require weeks of labor, our expandable units are engineered for a “rapid-deploy” workflow. This efficiency allows your clients to move from delivery to occupancy in under an hour, significantly reducing on-site labor costs and technical barriers.

Expandable Container House Installation: Complete Step-by-Step Guide for Fast Deployment

The Expandable Container House Installation process is engineered for speed, efficiency, and minimal labor requirements. With a fully prefabricated structure, the installation eliminates complex construction work, making it ideal for bulk housing projects, remote sites, and rapid deployment scenarios.


Step 1: Foundation Preparation for Expandable Container House Installation

Ensure a Stable and Level Base

A successful Expandable Container House Installation always starts with proper ground preparation.

  • The installation surface must be fully leveled and compacted
  • Prevent any risk of tilting, sinking, or structural stress
  • Suitable foundations include:
    • Concrete slabs
    • Steel base frames
    • Compacted gravel with leveling supports

Adjust Height for Structural Balance

After positioning the main unit:

  • Use 70mm anti-corrosion wood blocks or galvanized steel supports
  • Maintain a 50–70mm elevation gap under the side wings
  • This ensures:
    • Flat interior flooring
    • Proper door/window alignment
    • Long-term structural durability

Step 2: Unfolding Structure – Core of Expandable Container House Installation

Release and Lift the Roof System

This is the most critical phase of Expandable Container House Installation.

  • Unlock all top fixing latches
  • Lift the roof using:
    • Crane equipment or
    • Manual support beams (2.8m recommended)
  • Keep the lifting angle ≤ 90° for safety

Deploy Floor and Side Wall Panels

  • Lower the floor panels into position
  • Use multiple workers to handle side walls (heaviest components)
  • Ensure:
    • Vertical alignment
    • Secure locking into position

This prefabricated system eliminates:

  • Welding
  • On-site cutting
  • Complex sealing

Step 3: Side Wing Alignment and Structural Locking

Install Side Walls into Roof Channels

During Expandable Container House Installation:

  • Rotate and lift both side walls into vertical position
  • Insert walls into prefabricated roof water channels

Benefits:

  • Enhanced structural strength
  • Built-in waterproof sealing system

Controlled Roof Lowering

  • Remove temporary supports
  • Slowly lower the roof panel
  • Ensure precise alignment with wall sections

Step 4: Complete Structural Expansion and Sealing

Secure Wall Panels with Integrated Seals

Each panel includes:

  • EPDM waterproof rubber strips
  • Automatic sealing during locking

Final Expansion Procedure

  • Loosen top rope buckles with an electric wrench
  • Lower bottom plates
  • Install external wall panels in sequence

After both sides are installed:

  • Remove auxiliary supports
  • Fully lower the roof

Result:

  • Fully enclosed, weatherproof structure within minutes

Step 5: Structural Fixing for Long-Term Stability

Reinforce Main Frame Connections

Key actions in Expandable Container House Installation:

  • Snap wall panels into return tanks
  • Ensure perfect wall parallelism
  • Use:
    • Flat-head drill screws
    • L-shaped reinforcement brackets

Strengthen Critical Connection Points

  • Wall-to-roof connections
  • Wall-to-floor joints
  • Rotating wall fixing points

Outcome:

  • Wind-resistant, high-strength modular structure

Step 6: Interior Partition Installation

Install Layout-Based Partition Walls

  • Follow pre-designed floor plan drawings
  • Fix L-shaped positioning angles

Secure Prefabricated Panels

  • Install panels in sequence
  • Fix using high-strength rivets

Advantages:

  • Fast interior setup
  • Clean and professional finish
  • Ready-to-use functional spaces

Step 7: Doors and Windows Installation

Install Window Frames and Sliding Systems

  • Follow sequence:
    1. Vertical positioning
    2. Horizontal fixing
  • Install aluminum alloy sliding windows

Apply Waterproof Protection

  • Use industrial sealant around all edges
  • Install rain covers above windows

Result:

  • Improved weather resistance
  • Long-term durability

Step 8: Interior Finishing and Decorative Installation

Install Interior Moldings

  • Corner moldings (bamboo/wood fiber)
  • Decorative seam covers

Purpose:

  • Hide structural joints
  • Improve interior aesthetics

Seal All Gaps

  • Apply seam lines between:
    • Wall panels
    • Floor joints

Step 9: Skirting and Seam Closure

Install Skirting Lines

  • Use 45-degree angle joints for corners
  • Fix with industrial adhesive

Add Seam Folded Parts

  • Cover structural gaps
  • Fix with drill screws

Benefits:

  • Dust prevention
  • Moisture resistance
  • Premium interior finish

Step 10: Kitchen Installation and Final Setup

Install Cabinets and Countertops

  • Position integrated cabinets
  • Install marble or stone countertops
  • Apply sealant and allow 24-hour curing

Install Sink and Plumbing

  • Cut precise sink openings
  • Seal all joints to prevent leakage

Final Stage of Expandable Container House Installation

Once installation is complete:

  • Connect electricity and water systems
  • Perform final inspection:
    • Structural stability
    • Sealing performance
    • Alignment accuracy

The unit is now fully operational and ready for immediate use.
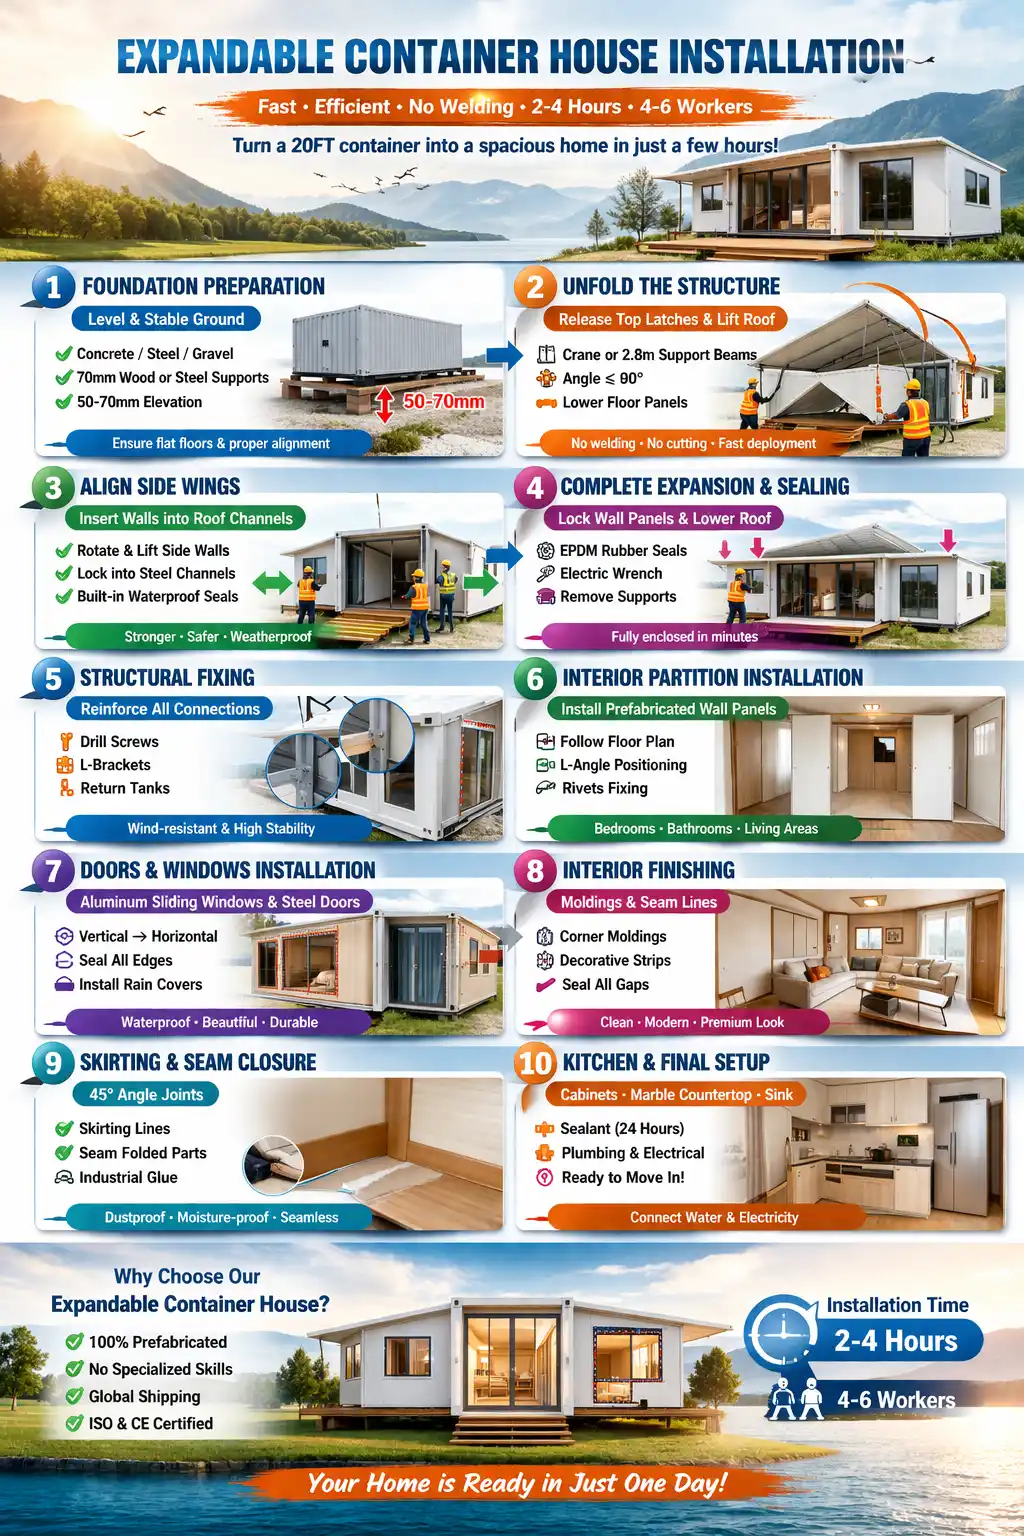

Why Our Expandable Container House Installation Stands Out

  • Installation Time: 2–4 hours
  • Labor Requirement: 4–6 workers
  • No Welding Required
  • 100% Prefabricated Components
  • Export-Ready with Global Compliance

A technical 10-step infographic for expandable container house installation, detailing foundation preparation, structure unfolding, and interior finishing by professional workers.

StepTitleMain Points
1Foundation PreparationLevel the ground. Use concrete slab, steel frame, or compacted gravel. Add 50-70mm supports under side wings.
2Unfolding StructureUnlock latches. Lift roof with crane or beams. Lower floor and side walls. No welding needed.
3Side Wing AlignmentLift side walls into roof channels. Lower roof slowly and align properly.
4Structural ExpansionSecure walls with seals. Lower bottom plates and external panels. Fully close the structure.
5Structural FixingFix walls with screws and brackets. Strengthen all connections for stability.
6Interior PartitionsInstall partition walls according to floor plan using rivets.
7Doors and WindowsInstall windows and doors. Seal all edges with waterproof material.
8Interior FinishingAdd corner moldings and cover seams for clean look.
9Skirting and SeamsInstall skirting boards and cover all gaps.
10Kitchen and Final SetupInstall kitchen cabinets and sink. Connect electricity and water. Do final check.

Conclusion: Partner with Expandable Container House supplier

A professional Expandable Container House Installation is more than just a setup process—it directly impacts project timelines, cost control, and long-term structural performance. For B2B buyers, contractors, and project developers, choosing a system that is engineered for fast deployment and repeatable installation is critical to scaling operations efficiently.

Our Expandable Container House  solution is designed with global bulk procurement in mind. From precision-manufactured components to simplified on-site assembly, every detail supports faster project turnover, reduced labor dependency, and consistent quality across multiple units. Whether you are developing worker camps, temporary offices, or modular housing projects, this installation system ensures predictable results and minimal risk.

With extensive export experience, we provide not only high-quality products but also complete installation guidance, price support, technical support to your local requirements. This allows importers and distributors to confidently deliver projects without delays or technical barriers.

If you are looking for a reliable supplier who understands the real challenges of Expandable Container House Installation at scale, we are ready to support your next project with proven solutions, fast delivery, and full-service support.

Contact us today to get detailed project quotes, and customized solutions for your market.


Leave a Reply

Your email address will not be published. Required fields are marked *

Post Comment
Index